Installing Tegrita Cloud Apps
Overview
To install a Tegrita Cloud App, follow the steps outlined below.
First, talk to your Tegrita contact to make sure that your instance has been granted access to the app. They will provide you with an installation URL. Once you have that URL, follow these steps to install the app:
Installation Steps
- Log in to your Eloqua instance.
- In the same browser window, open another tab and go to the installation URL provided to you.
- Authorize the installation of the Cloud App.
- To verify the installation, create a new, blank campaign or contact program canvas. For Cloud Apps that work with CDOs you may need to create a CDO program canvas.
- Open the Campaign Steps or Program Steps toolbar on the left side of the screen.
- Click the triangle next to Campaign Steps or Program Steps to display installed apps. Your Tegrita contact can tell you what type of step your app is — an action step, decision step, or feeder.
- Look for your app in the list under Campaign or Program Steps. Here is what the Randomize Contact Cloud App looks like once installed:
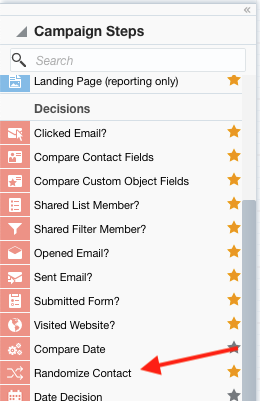
If you expect to use the Cloud App you've just installed frequently, click the star to the right of the app name to make it a favorite. That way, the app will always be displayed and you won't need to click the triangle to see it.
Tip
If you have problems, reach out to your Tegrita contact and we'll be happy to help.
IP Address Restriction
If your Eloqua instance has enabled IP Address Restrictions, you will need to add the IP addresses for Tegrita's Cloud App servers to the list of allowed IP addresses. Here are the IP addresses to add:
150.136.140.118132.226.44.28129.80.250.225